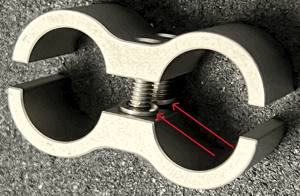
THE TWO SPLIT WASHERS MUST GO BETWEEN THE TWO BARREL CLAMPS!!
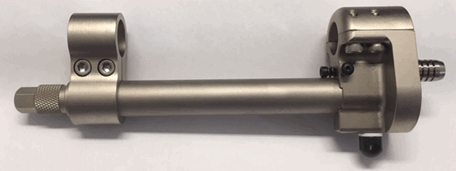
STEP 1 - Stabilizer bar comes Pre-installed already in the gas block. The bar is aluminum so if you are ever going to remove the bar using a wrench make sure you take precautions to pad the wrench or gas plug so you do not mar the finish. The front clamp works and looks best if it is positioned just behind the grove on the front of the Stabilizing bar as shown above. Use Blue Loctite on the two clamping screws if you do not want them coming
- You have received your new gas block. The First Thing We Request of you is that you NOT try to rotate the Gas Pressure Adjustment Screw!!! (LONG BLUE ARROW PICTURED BELOW)
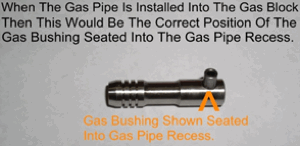
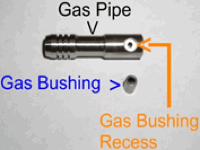
- You must first install your gas bushing from your current Ruger factory gas block into the new gas block.
- When installing the bushing into your new gas block MAKE SURE that the gas bushing will drop all the way in and bottom out in the gas pipe recess.
- If the gas bushing does not drop all the way in and seat you will damage the gas pipe when you tighten the gas block to the barrel. If the gas block will not sit flush on the barrel, then you do not have the bushing seated correctly or the gas bushing is too long. If the bushing it too long, it may have to be trimmed in length. (If you are not sure how to do this call us we will be happy to help you or go to TRIMMING GAS BUSHING LENGTHS and view our instructions page on how to trim gas bushings.)
- Once the bushing is seated install the gas block to the barrel.
- Install all supplied 8-32 screws (Do Not Try To reuse your factory screws they are the wrong thread!!) When all four gas block screws are installed make sure the gap on both sides of the gas block top & bottom are even.
- Use a 9/64 wrench to hand tight all 8-32 screws evenly. Then go back with a torque wrench and set the TORQUE screws 32 Inch Pounds of torque (BLACK STEEL) OR (25 Inch Pounds STAINLESS STEEL) and finish tightening. Do the same TORQUE with the front clamps.
- The G.P.A.S. is pre-set 50% open. DO NOT BACK IT OUT ANY FURTHER!! (LONG BLUE ARROW PICTURED BELOW)
- Fire 3 to 5 rounds and take notice where the spent shell casings land. Optimally 4 to 10 feet is about the proper distance and proper gas pressure setting in which you should try to achieve.
- If the rifle is not ejecting the spent casing in the 4 to 10-foot range you will need to make a gas pressure adjustment. (If rifle is not cycling then more pressure is needed. If cycling to hard then less gas pressure is needed. To make adjustments Loosen the 4-40 lock nut on the set screw and turn the set screw slightly One full turn counterclockwise to remove pressure off the G.P.A.S. Then slightly turn the gas pressure adjustment screw located in the front of the gas block below the barrel in the desired direction. (clockwise is less gas pressure and counter clockwise is more gas pressure). Then re-tighten the 4-40 set screw and 4-40 lock nut (LONG RED ARROW PICTURED BELOW) so that the set screw will not back out and re fire the rifle (DO NOT OVER TIGHTEN JUST SNUG OTHERWISE YOU WILL DAMAGE THE GAS PRESSURE ADJUSTMANT SCREW!). Repeat the steps until you achieve the results as mentioned above in numbers 7 & 8.
- If the rifle is throwing the spent casings further than you would like you will need to start to close the G.P.A.S. one 16th turn at a time. Then fire the rifle and repeat if needed until you achieve your desired gas pressure adjustment screw position. A little turn can make a big change so turn G.P.A.S in small increments.
- If you are not sure where full open should be because you have moved the G.P.A.S. during installation, remove the gas block and gas bushing then look into the gas hole where the gas bushing was. You should be able to see the tip of the gas pressure screw in the gas hole. Make an adjustment till the tip of the screw is just starting to come into view and that will be wide open. When you start to make an adjustment clockwise you will start to see the screw come across the gas hole and start to close it off this is reducing gas pressure. If you continue to turn the G.P.A.S you will close off the gas hole completely and the rifle will not cycle. When fully closed there is no gas delivered to the operating rod and the rifle will not cycle. At that point you can now slowly turn the G.P.A.S. counter clockwise a maximum of 3 full turns and no more, that will be fully open. If you do open the G.P.A.S. more than 3 turns you will lose the G.P.A.S. and the replacement cost is $20.00.
Gas Pressure Set 4-40 Screw Is Installed.
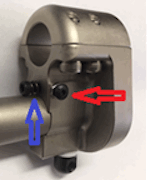
STEP 3 - When you receive the gas block the Gas Pressure adjustment screws Set Screw is installed and Snugged down. Leave it as we set it till you are ready to make adjustments to the gas pressure adjustment screw. You will need to loosen the set screw to make adjustments then snug it back down *DO NOT OVER TIGHTEN! JUST SNUG! >> 
PRICES SUBJECT TO CHANGE WITH OUT NOTICE!
Accuracy Systems' location is not a retail/store front. It is a machine shop with dangerous machines running. For your safety we do not accept walk-ins. PLEASE CALL FOR AN APPOINTMENT IF YOU ARE GOING TO VISIT. THANKS.
Hours of operation are Monday thru Thursday 8:30 AM to 4:30 PM, Friday 8:00 AM to 12:00 PM Mountain Time Zone
(Closed Saturday & Sunday)
All prices stated in this web site are subject to change without notice.
Hosted, Maintained, Promoted, & Optimized for Search Engine Placement by Hosting Texas
Contact the Webmaster
Links to our favorite gun related sites. - Site Map
Hours of operation are Monday thru Thursday 8:30 AM to 4:30 PM, Friday 8:00 AM to 12:00 PM Mountain Time Zone
(Closed Saturday & Sunday)
All prices stated in this web site are subject to change without notice.
Hosted, Maintained, Promoted, & Optimized for Search Engine Placement by Hosting TexasContact the Webmaster
Old Tree Gun Blanks - Gun News Daily - Gun News Daily's Holsters - Body Armor - Mike Niles Outfitting - OutfitterPros.com - Gun Safes - New Mexico Elk Hunting - Antelope Hunting

