New Generation 5 & 6 Adjustable Gas Block Instructions.
WARNING: Torque Specifications for all BLACK 8-32 TOP Gas Block Screws is 30 Inch LBS and Stainless Screws is 26 Inch LBS! Except for the set screw which is 4 Inch LBS!!
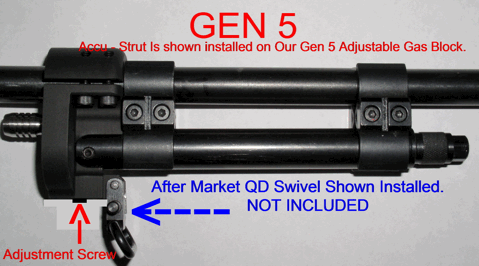
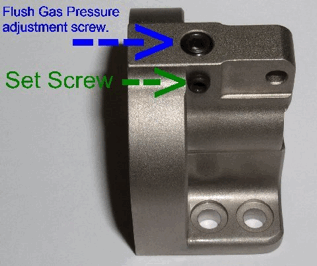
NOTE 1: When you receive the gas block the Gas Pressure adjustment screws Set Screw is fully tightened. Before making any adjustments you need to back out the set screw enough so that the head of the Gas Pressure Adjusting Screw head does not hit the set screw which will stop any further inward or clockwise adjustment for less pressure. When completed making your adjustment snug the set screw so you do not damage the G.P.A.S. threads! If you apply too much pressure you will crush the threads on the G.P.A.S. and you may not be able to adjust it anymore. There will be a cost for us to fix it.
- Please do NOT try to rotate the Gas Pressure Adjusting Screw on the of the gas block until you have read the instructions fully and it has been installed on the barrel!
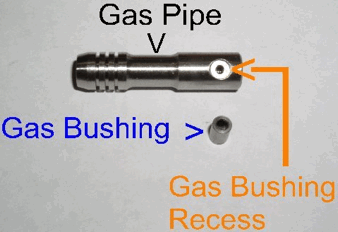
- You will need to install your gas bushing from your current Ruger factory gas block into the new gas block.
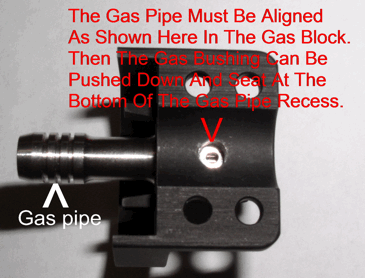
- When installing the gas bushing into your new gas block, understand that the gas pipe may need to be pulled on slightly and at the same time nudge left or right just a fraction.
- Do this while looking into the gas bushing hole in the gas block.
- You can then see the recessed hole in the gas pipe.
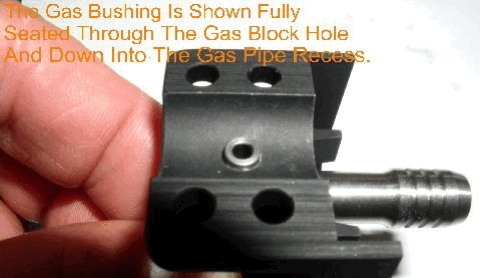
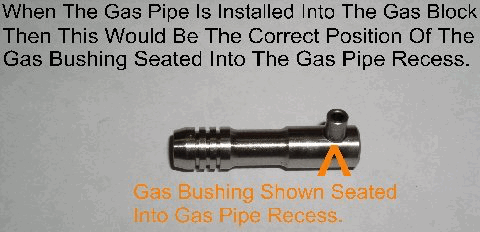
- Make sure they are aligned. This way the gas bushing will seat in through the gas block’s bushing hole and down into the recessed gas pipe hole. (See Illustration 1# & #2)
- If the gas block will not sit flush on the barrel
- You do not have the bushing seated correctly or the gas bushing is too long.
- If the bushing it too long it may have to be trimmed in length
- If the gas bushing does not drop in all the way and seat, the gas pipe still may be rotated or not aligned.
- This is not correct and the gas block will not sit flush on the barrel resulting in damage to the gas pipe when tightening the gas block on to the barrel. ** When trimming the gas bushing please refer to our website PRODUCT INSTRUCTIONS Trimming gas bushings for Harmonic Barrel Stabilizer II, Adjustable Gas block & Non Gas blocks.
- Once the bushing is seated and the gas block is installed onto the barrel it is time to test fire your rifle.
- The Gas Pressure Adjusting Screw is preset to fully open DO NOT BACK IT OUT ANY FURTHER! If the rifle is throwing the spent casings further than you would like you will need to start to close (Clockwise) the Gas Pressure Adjusting Screw a very small turn at a time until you achieve your desired distance the spent casings are being thrown.
- If you are not sure where full open should be because you have moved the Gas Pressure Adjusting Screw during installation then turn the G.P.A.S. clock wise till it stops, that is fully closed.
- Fully closed there is not any gas being delivered to the operating rod and the rifle will not cycle.
- At that point you can slowly turn the G.P.A.S. clockwise a maximum of 3.5 to 4 full turns and no more, which is fully open.
- If you do open the G.P.A.S. more than 4 turns you may lose the G.P.A.S. and the replacement cost is $29.99.
NEED HELP? PLEASE CALL US. 303-822-6849
