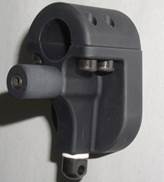
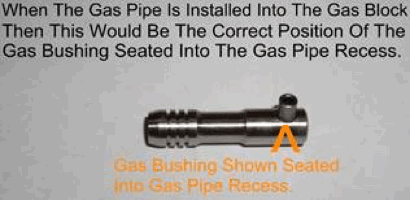
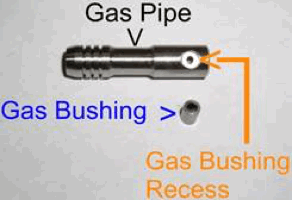
1) Please do NOT try to rotate the adjusting knob on the front of the gas block until you have read the instructions fully and it has been installed on the barrel! A) You need to install your gas bushing from your current Ruger factory gas block into the new gas block. B) When installing the gas bushing into your new gas block, understand that the gas pipe may need to be pulled out slightly and at the same time rotated left or right just a fraction. C) Do this while looking into the gas bushing hole in the gas block. D) You can then see the recessed hole in the gas pipe. E) Make sure they are aligned. This way the gas bushing will seat in through the gas block’s bushing hole and down into the recessed gas pipe hole. (See Illustration 1# & #2)
2) If the gas bushing does not drop all the way in and seat, the gas pipe still may be rotated or not aligned. F) This is not correct and the gas block will not sit flush on the barrel resulting in damage to the gas pipe when tightening the gas block on to the barrel. G) When the gas bushing is seated all the way into the gas pipe it should not rotate. ***If you find that your gas bushing is too long please refer to our website as how to trim the bushing to the correct length. The gas bushing must not be too long or the gas block will not fit flush to the barrel and you will damage the gas pipe.3) Once the bushing is seated and the gas block is installed onto the barrel it is time to test fire your rifle. H) The adjusting knob is preset to fully open DO NOT BACK IT OUT ANY FURTHER! If the rifle is throwing the spent casings further than you would like you will need to start to close (Clock wise) the adjusting knob one click at a time until you achieve your desired distance the spent casings are being thrown. I) ** If you are not sure where full open should be because you have moved the Knob then follow these instructions: A) Remove the gas block if you have already installed it. Then with the gas bushing removed look into the hole in the gas pipe where the bushing would sit. B) Make sure you are in a well lit area. C) Then looking into the hole you should see the gas pressure adjusting screw that is connected to the knob. D) Back it out till the tip of the screw is flush with the side of the gas port hole and that will be fully open. E) Turning Clock wise, count the turns till you can see the screw closing the Gas port hole that is fully closed. **Remember how many turns you have taken so you know the maximum amount of turns it will take to be fully open. Do not turn the knob out any more than the number of turns it took to close it. If you do you will loose gas pressure Knob!! When fully closed there is no gas delivered to the operating rod and the rifle will not cycle. At that point you can turn the Knob a little Counter clock wise until it starts to cycle, but no more than your turn count that will be fully open. J) Special note: Some rifles may require that the gas port hole be enlarged if the rifle does not cycle. The gas port is the hole in the barrel that the gas passes through into the gas block. This is very easy to do. Please call us and one of our qualified gunsmiths will walk you through the 2 minute process.
INSTRUCTIONS FOR TIGHTENING THE GAS BLOCK TO THE BARREL.
WARNING: DO NOT OVER TIGHTEN THE FOUR TOP GAS BLOCK SCREWS (40 Inch LBS maximum)!!!
✓ First snug up each screw with the Allen wrench that was provided using even pressure on each screw as you tighten.
✓ Use an alternating crisscrossing pattern as you tighten in that way there is no warping of the bottom of the gas block screw hole flanges.
✓ Make sure you have the gap even on both sides between the top & bottom half’s of the gas block as you tighten.
✓ Yes there is a gap. The gas blocks are made from one piece of 7075 alloy then cut in half. The width of the cutter determines the gap size and we use the thinnest cutter possible.
✓ Now you will need a torque wrench otherwise you could over tighten and break the gas block bottom.
✓ Make sure you apply even pressure when tightening with the torque wrench.
✓ After all the above has been accomplished use your torque wrench in the same tighten pattern as stated above. TOURQE TO 40 INCH POUNDS. Again using even pressure a little bit at a time on each screw.
✓ The 7075 Alloy is pound for pound stronger than steel. However it can and will break if it is over tightened.
✓ If you break it. It is not considered a manufactures defect and WILL NOT be covered under the 90 warranty! You will need to purchase a new bottom. The replacement cost is $90.00 and you must return the broken bottom in exchange for a new one.
✓ NEED HELP? PLEASE CALL US AT 303.822.6849 or E Mail us at accuracyinc1@aol.com
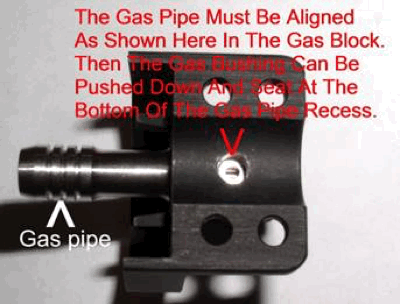 #1
#1
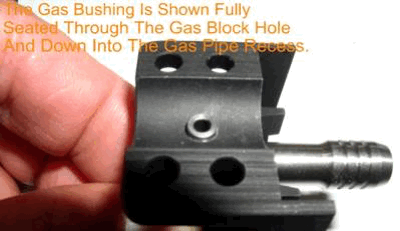 #2
#2
Contact us at: Accuracy Systems, Inc. 1661 Behrens Rd. Byers, CO 80103
Phone 303.822.6849 or accuracyinc1@aol.com
Visit us at www.accuracysystems.com
Revised 5/18/2015
